Tutorial

Every feature in Sayt, step by step

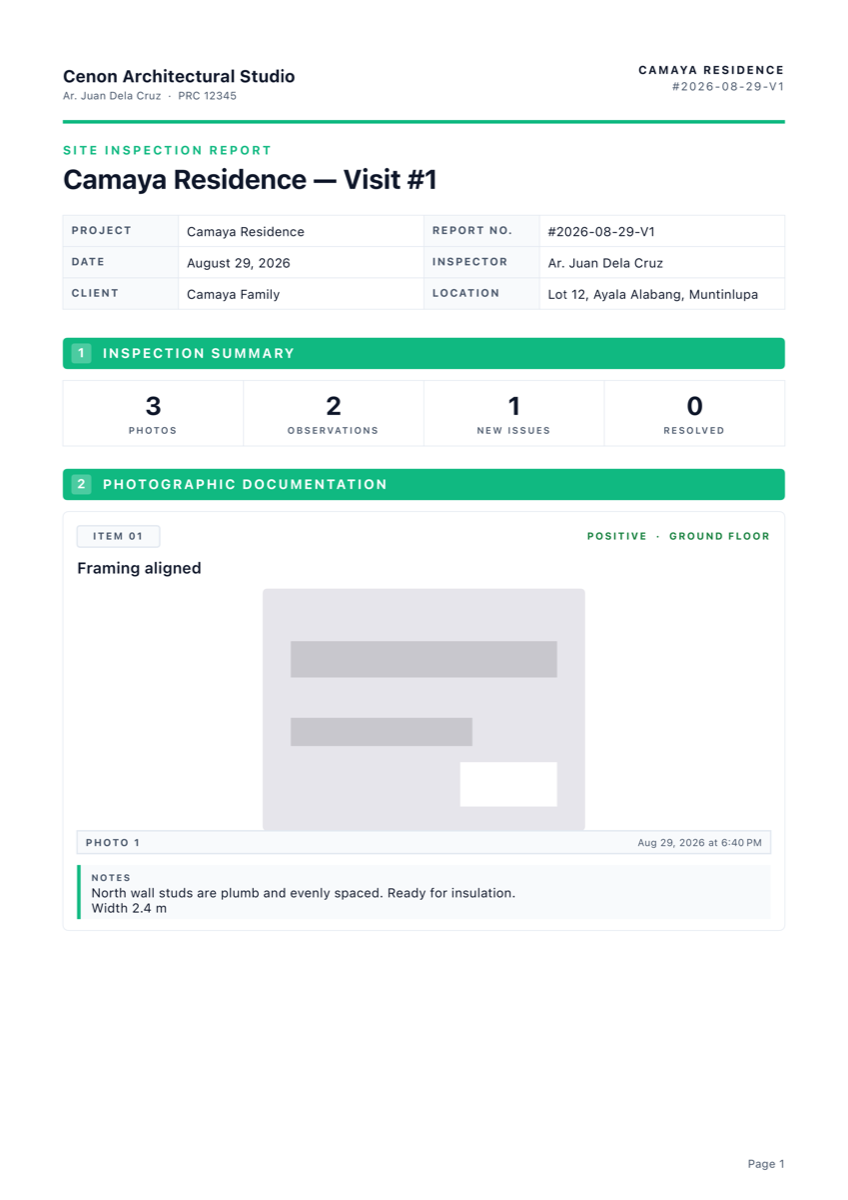
Thirteen steps covering the whole app, not just the highlights — from creating your first project through to handing a visit off to a colleague. Screenshots and report pages here are real, from the same Camaya Residence visit used throughout this site.

Version 1.1 · TestFlight beta · Last updated 13 September 2026

Before you start. The first time you open Sayt, pick the role that matches your work — civil engineer, QA/QC checker, architect, inspector and 14 others are available. This changes the finding categories and the wording of the report to match, so the rest of the app already speaks your language. Covered in full at step 13.

Contents

Step 1 of 13

Create a project and start a visit

A project holds a client, a site address, a project type, its floor plans and its reusable checklist — set up once. Import one plan per floor if you have them; you can add more later.

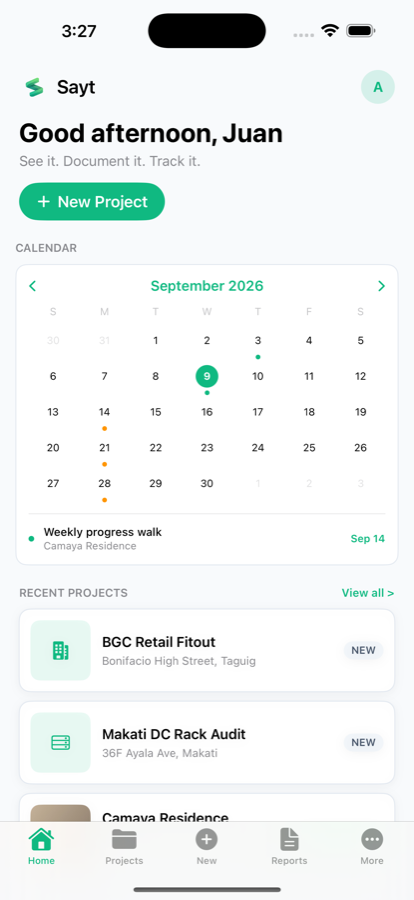
Inside the project, start a visit every time you're on site. Visits are numbered automatically, so "Visit #4" on a report is never ambiguous, and the home screen marks every day you've documented on its calendar.

  • Client, address, project type and plans held once per project
  • Multiple floor plans supported — one per floor is typical
  • Visits numbered sequentially and dated automatically
  • Projects can be moved to Trash and restored (Pro)
Sayt home screen showing a September calendar with documented days marked and an upcoming weekly progress walk

Step 2 of 13

Photograph and annotate a finding

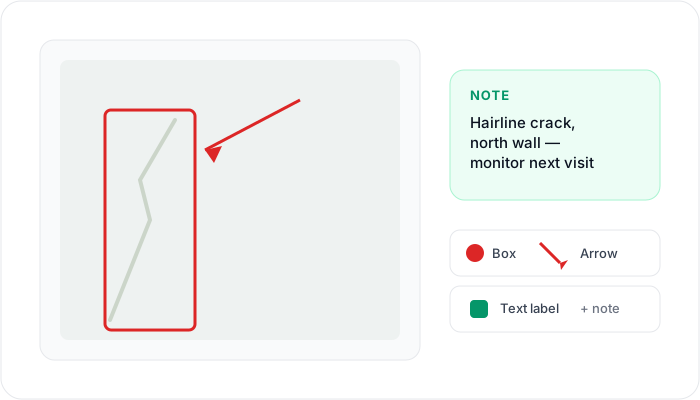
Photographs are taken inside the visit, not imported afterwards from your camera roll — so every image is automatically tied to the right project, visit and finding. Mark one up with arrows, boxes and text right on site, while what you meant is still obvious, and add a quick note.

A camera level overlay helps square up elevation shots, and can be turned off if it's in your way.

  • Photos captured in-app, saved to the app's own storage on the device
  • Annotate with arrows, boxes and text
  • A quick note per photo
  • Optional camera level overlay for square elevation shots
Diagram of a photo with a red box drawn around a crack, an arrow pointing at it, and an attached text note reading north wall, monitor next visit

Step 3 of 13

Log an observation, or promote it to an issue

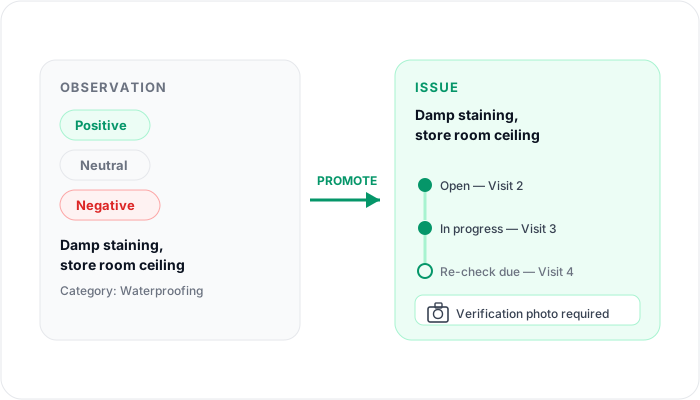
An observation is something you saw. Type it as positive, neutral or negative, and give it a location and a category so it sorts correctly in the report.

An issue is something that has to be fixed, and therefore has a life beyond this one visit. Promote an observation to an issue and it picks up a status, a timeline of events across every later visit, and verification photographs when you re-check it — which is what makes a genuine follow-up report possible, rather than a fresh list each time.

  • Observations typed positive, neutral or negative
  • Location and category on every observation
  • Promote to an issue when it needs tracking across visits
  • Issues carry a status, a timeline and re-check evidence
Diagram of a negative observation, damp staining on a store room ceiling, being promoted into a tracked issue with an open, in progress and re-check due timeline, and a required verification photo

Step 4 of 13

Measure it with the camera

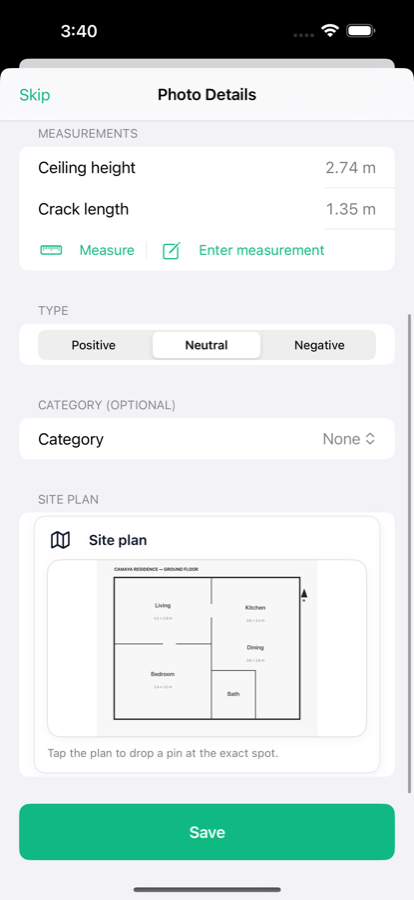
Tap Measure on a finding and point the camera at what you need sized, using ARKit. Set the two ends and Sayt reads the distance off the camera — a ceiling height, a crack, the width of an opening — and writes it onto the finding. Prefer to type a number you already know? Use Enter measurement instead; it's stored and labelled the same way.

Chain several lines around an opening, a floor or a patch of damage, then close the shape and Sayt calculates the enclosed area — "how much render needs replacing?" answered on site rather than estimated later.

  • Lengths and enclosed areas, both saved to the finding
  • On iPhones with LiDAR, Sayt ranges against real geometry — noticeably more accurate on irregular surfaces such as rubble, render or damaged masonry. Without it, it measures against detected planes
  • Metric or imperial, switchable at any time — the stored value never changes, only how it's shown
  • Where ARKit tracking isn't available, the tool falls back to manual entry rather than failing
  • Every measurement carries into the report
A finding with a measurements list reading Ceiling height 2.74 m and Crack length 1.35 m, plus Measure and Enter measurement buttons

Step 5 of 13

Read the ruler on the wall

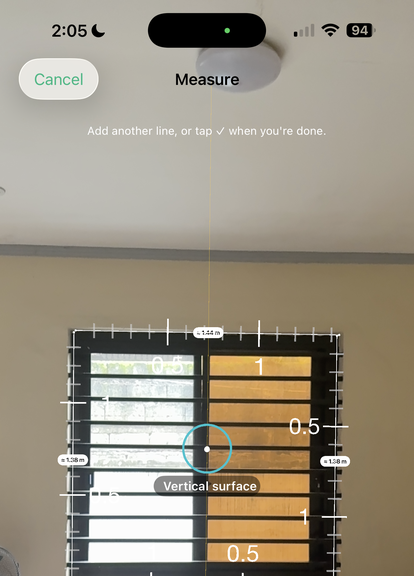
While you measure, Sayt draws a graduated ruler along whatever you're pointing at, numbered like a real tape. Each side of a chained shape keeps its own length, so a window comes back as four figures rather than one.

It also tells you what it has locked onto — Vertical surface or Horizontal surface — so you know the reading is coming off the wall you meant.

  • Graduated ticks and numbers along every line
  • Each side of a shape labelled with its own length
  • Tap a value to flip between metric and imperial
  • Every figure marked — an estimate, and it says so

Camera measurements are digital estimates. They're accurate enough to size an opening or brief a trade, but check critical dimensions with a tape before ordering material.

Sayt's measure tool with the camera aimed at a window: a graduated ruler is drawn around the frame with numbered ticks, each side labelled with its own length, and a Vertical surface badge under the crosshair

Step 6 of 13

Pin it to the plan

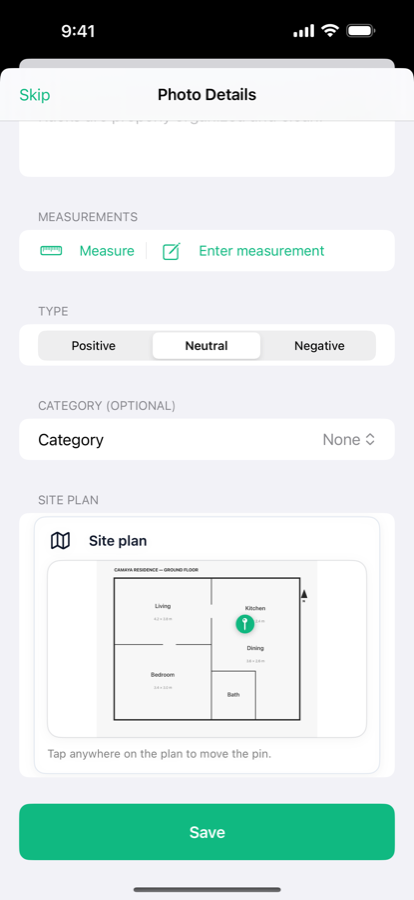
Import the floor plan — with the document scanner or from Photos — and tap it to drop a pin exactly where the finding is. The reader stops guessing which of four identical units, or which end of a corridor, the crack is in.

Pins are repositionable until you save, so getting it right takes a second, and are stored proportionally so they stay correct at any zoom or export size. Sayt also reads text off the plan and can offer the nearest label as the finding's location — accept it or ignore it.

  • Import with the document scanner or from Photos
  • One pin per finding, placed by tapping the plan
  • Pin positions stored proportionally — correct at any zoom
  • Nearest plan label suggested as the finding's location
  • Plan and pin both appear in the exported report
A finding's site plan with a green pin dropped in the kitchen of a ground floor plan, captioned tap anywhere on the plan to move the pin

Step 7 of 13

Work the checklist

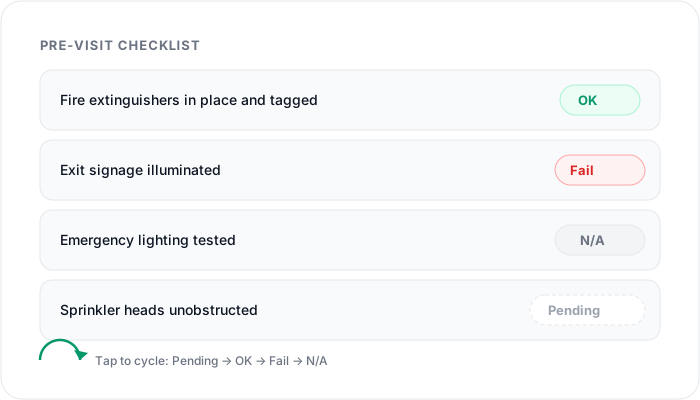
A project's checklist is authored once and reused by every visit that needs it — the standard set of items you check on a repeat inspection. Each item cycles through pending → OK → Fail → N/A, takes a note, and can carry its own photographs as evidence.

Results appear as their own section in the generated report, so a repeat inspection reads as a checklist run rather than a fresh set of observations each time.

  • One checklist per project, reused across visits
  • Four-state result per item: pending, OK, Fail, N/A
  • Note and photographic evidence per item
  • Appears as a dedicated section in the report
Diagram of a four-item pre-visit checklist showing OK, Fail, N/A and Pending states, with a note that tapping an item cycles it through those four states

Step 8 of 13 · Pro

Import a punchlist with OCR

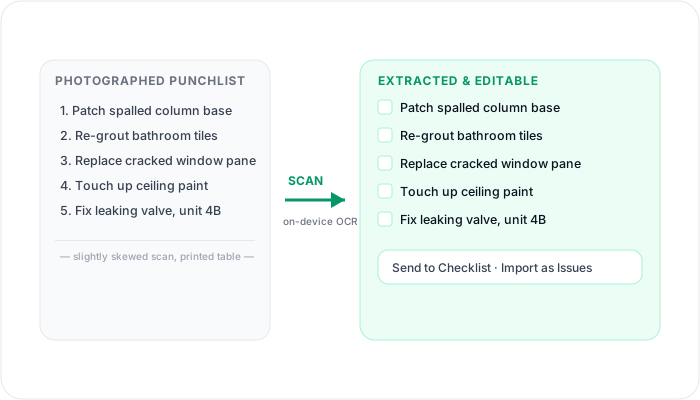
Clients and head offices send punchlists as photographs, scans and printed tables. Scan or pick one of these images and Sayt extracts the line items using Apple's Vision framework — entirely on the device, nothing uploaded anywhere.

Numbered lists (1., 1), (1)), bulleted lists (, -, *, ) and loose lines are all recognised, and detected column headers are separated out so they aren't imported as tasks by mistake. You confirm or edit each line, then send them to the pre-visit checklist or import them directly as punchlist issues.

  • Scans or picks a photographed or printed punchlist
  • Text recognition runs entirely on the device
  • Numbered lists, bulleted lists and loose lines all recognised
  • Column headers detected and excluded automatically
  • Review and edit every line before it's imported
  • Send to the checklist, or import as punchlist issues
Diagram of a photographed numbered punchlist on the left being scanned with on-device OCR into an editable checklist with checkboxes on the right

Step 9 of 13

Schedule the next visit

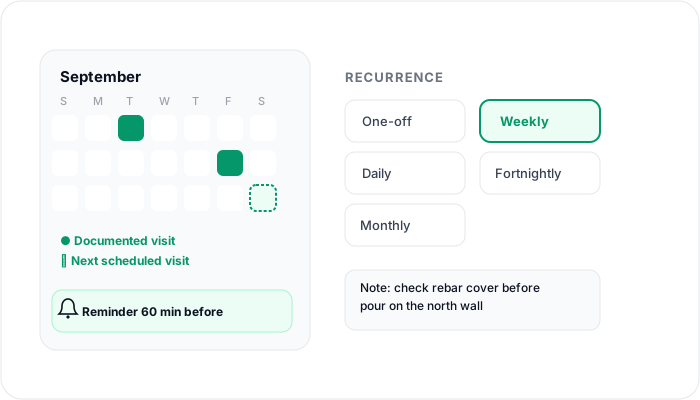
Set this up from the same screen, while you're still standing on site. Choose one-off, or a repeating schedule of daily, weekly, fortnightly or monthly, with an end date if the job has one, a note for what to check next time, and a reminder a chosen number of minutes beforehand.

Reminders are local notifications generated on the device — nothing is sent through a server to trigger them.

  • One-off or repeating: daily, weekly, fortnightly, monthly
  • Optional end date and a note for the next visit
  • Local reminder notification, timed however far ahead you choose
Diagram of a month calendar with documented and next-scheduled days marked, next to a weekly recurrence option chosen among one-off, daily, weekly, fortnightly and monthly, plus a reminder and a note for the next visit

Step 10 of 13

Preview before you send it

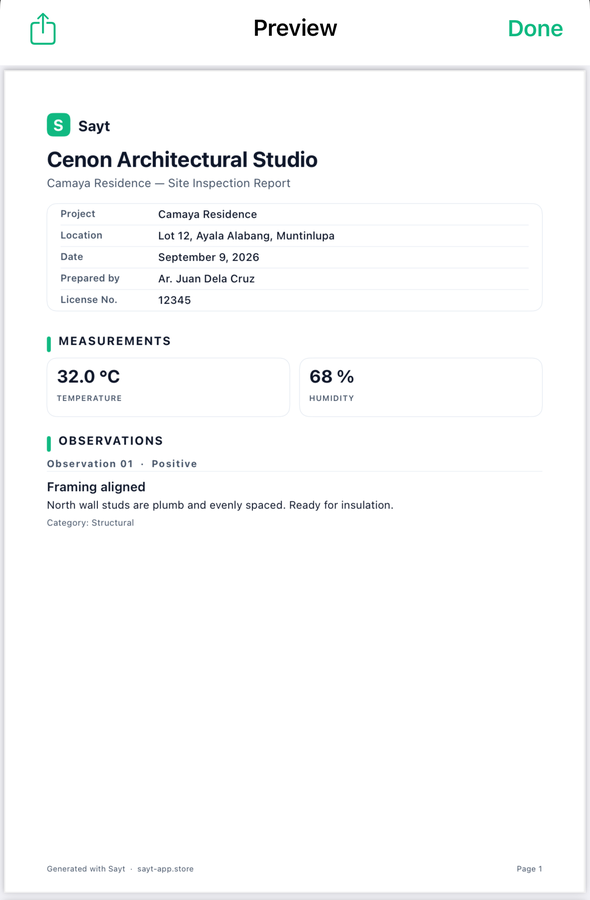
Before you generate anything, preview the finished pages — your company name, the project details, every measurement and observation already laid out. This is the real preview screen, not a mockup, from the same Camaya Residence visit used throughout this site.

Catch a typo, re-order a finding or add one more photo while it's still just a preview, rather than after a client already has the PDF.

  • Every page laid out exactly as it will export
  • Your company name, logo and licence number already on it
  • Nothing sent until you tap Generate
Sayt's report Preview screen for the Camaya Residence visit, showing project details, a measurements panel and a first observation, with Done in the top right

Step 11 of 13

Generate, and choose a template

Everything you recorded on site is already report-shaped, so generating the document is one screen and one tap. A report runs in a fixed order: branded header, project and visit details, measurements, observations, follow-up issues with their verification evidence, new issues raised this visit, a visit summary, checklist results, then a signature block.

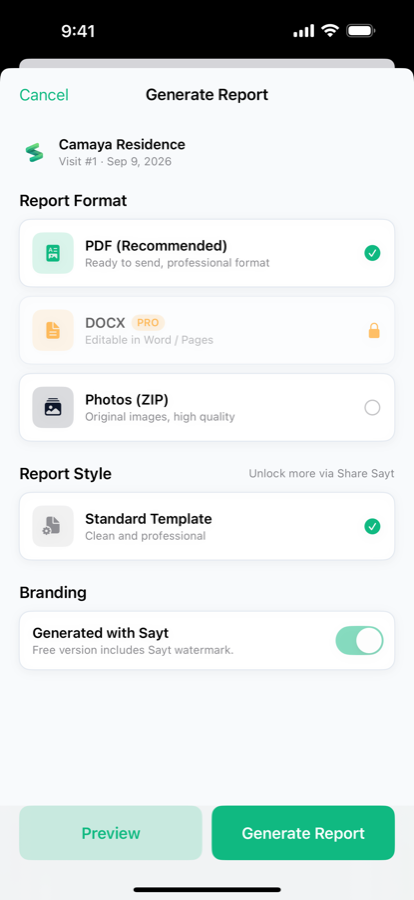
Choose the format — PDF, Word (DOCX, Pro) or the original photos as a ZIP — and the template that matches who's going to read it.

  • Preview it one more time before you generate
  • Toggle your branding — logo, licence, signature — on or off
  • Send it before you get back to the car
Sayt's Generate Report screen: PDF, DOCX and Photos ZIP formats, a report style picker, a branding toggle, and Preview and Generate Report buttons

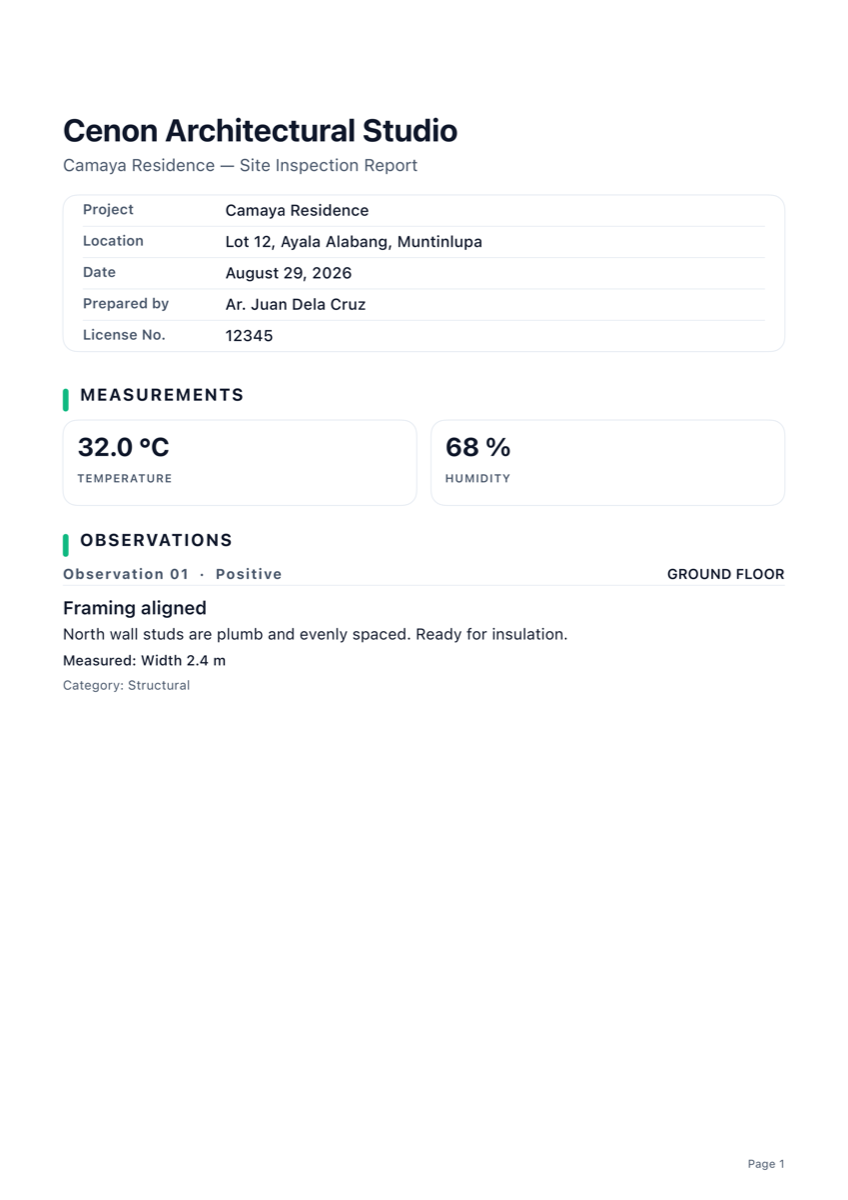
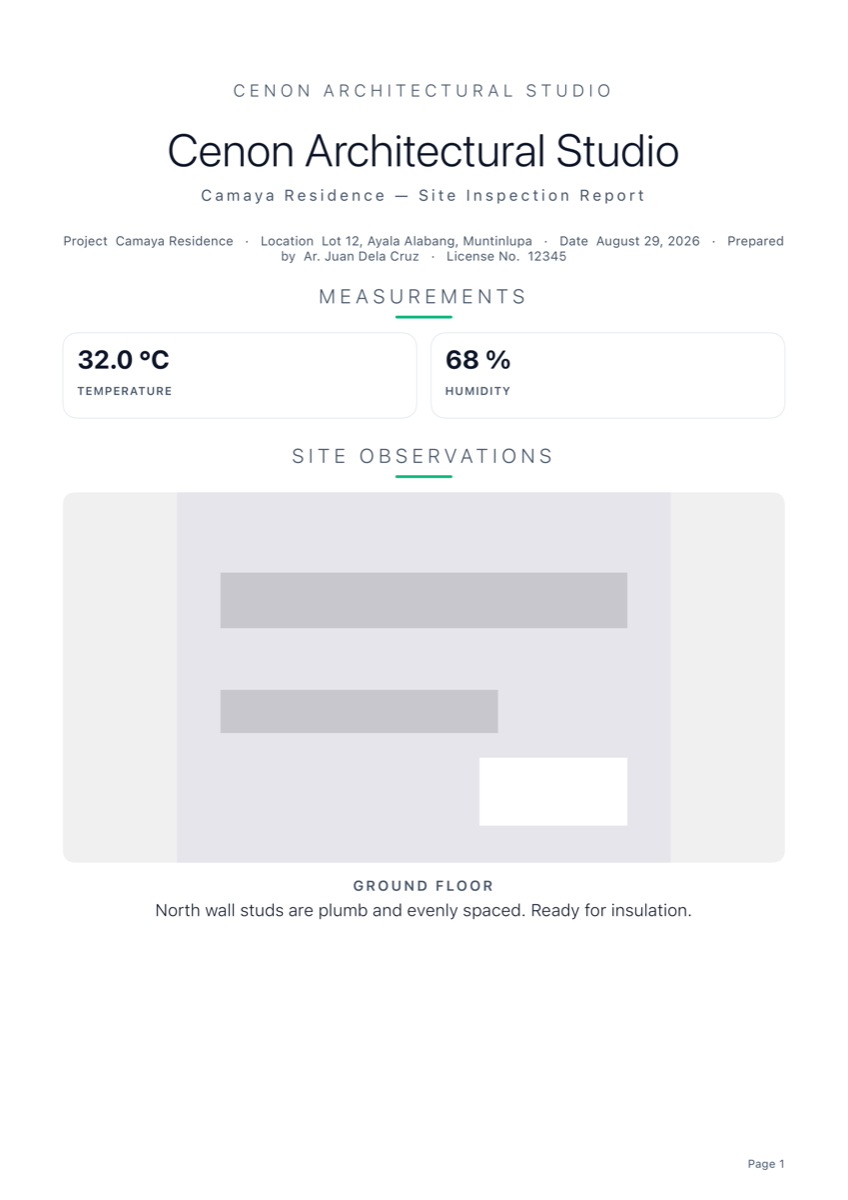
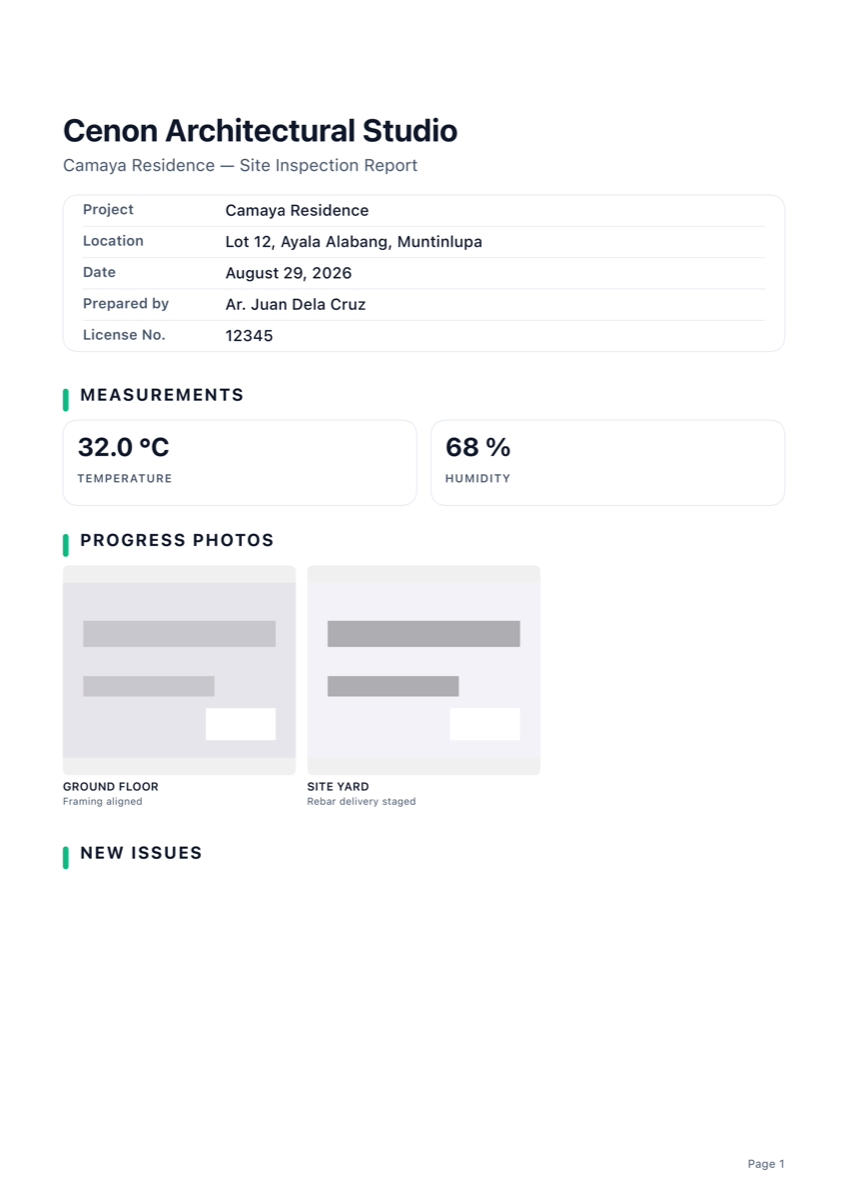
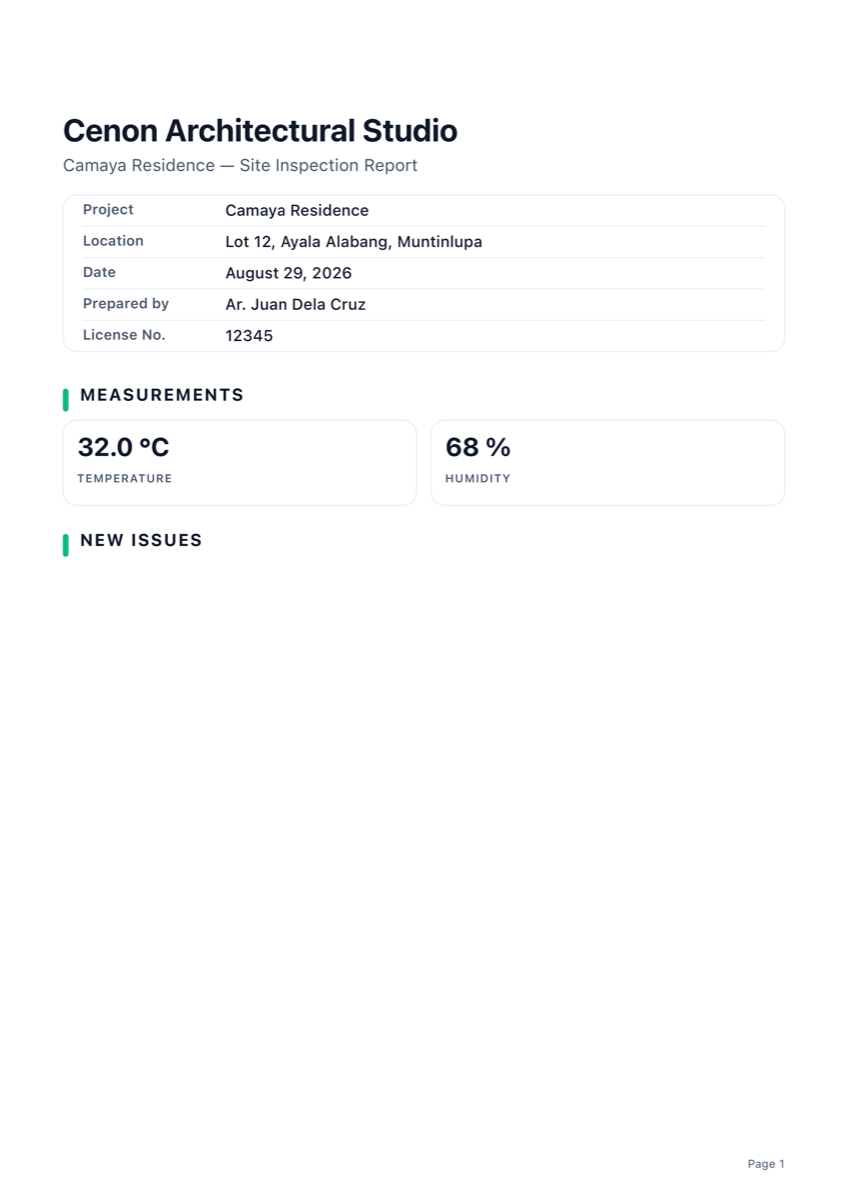
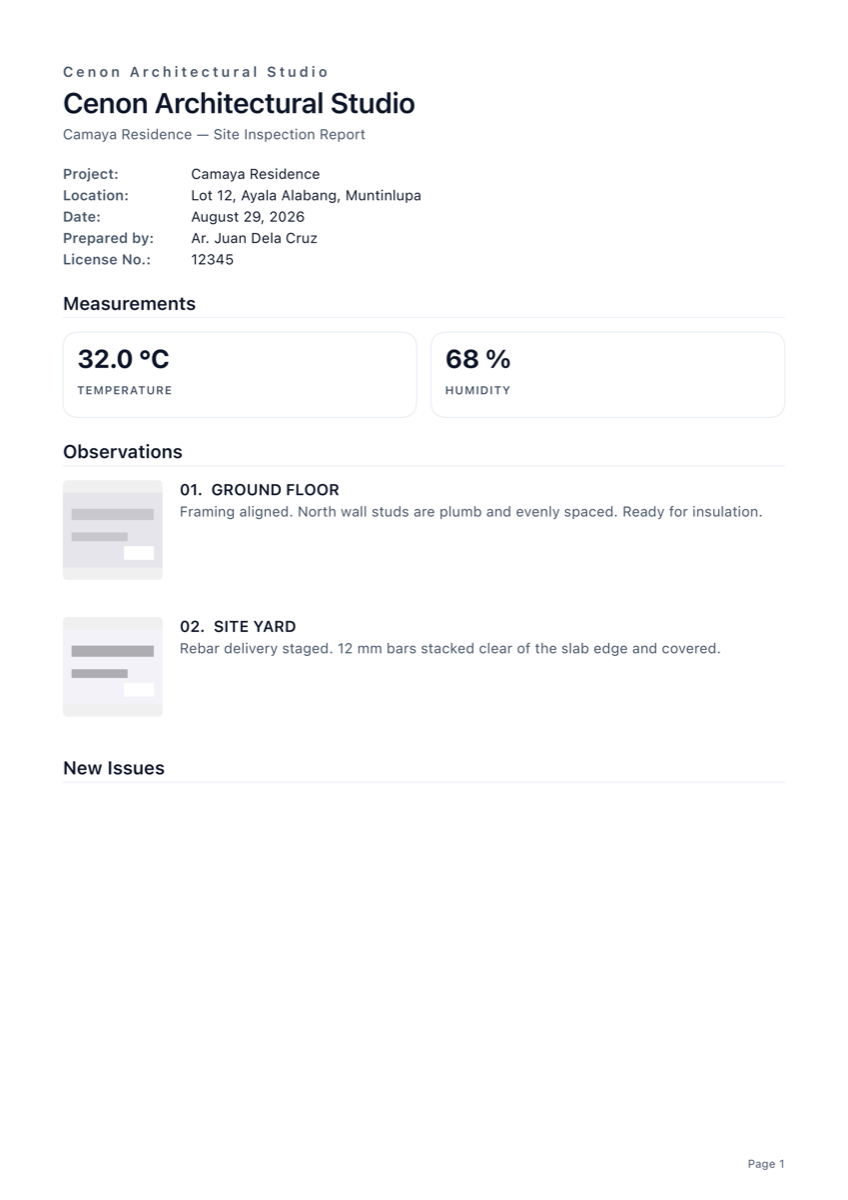
Six templates, one visit — this is what actually comes out of the generator, not a mockup, all from the same Camaya Residence site walk:

Step 12 of 13 · Pro

Hand off to a colleague

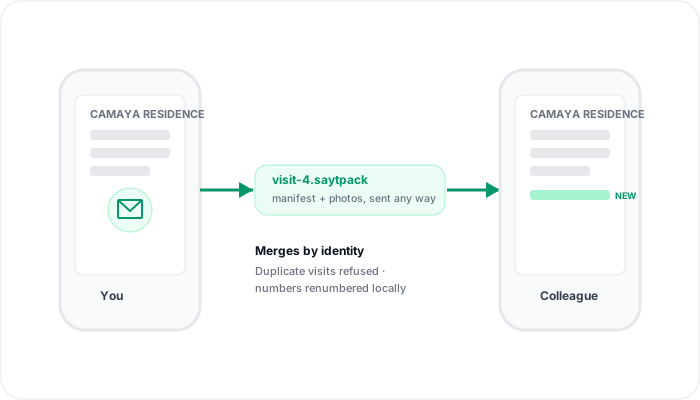
Export a visit, or a whole project, as a single .saytpack file — a manifest plus the photographs — and send it by whatever means you like: email, AirDrop, your usual file share. Nothing goes through a Sayt server; the file is the handoff.

On import it merges rather than duplicates: projects are matched by identity and then by name and address, visits and findings are matched by identity, an already-imported visit is refused outright, and visit numbers are renumbered locally to avoid collisions. Two people can genuinely work the same project without creating two copies of it.

  • Export a visit or an entire project as one .saytpack file
  • Send it any way you like — no server involved
  • Import merges by identity, not by overwriting
  • Duplicate visits are refused; visit numbers renumbered to avoid collisions
Diagram of a visit-4.saytpack file being sent from one phone to a colleague's phone, merging by identity, refusing duplicate visits and renumbering visit numbers locally

Step 13 of 13

Set your profession

Setting your profession changes the wording throughout the app and the report — the categories, the document title, even what a finding is called. Eighteen profiles are available, including architect, project architect, civil, structural, electrical, mechanical and sanitary engineer, contractor, site supervisor, construction manager, health inspector, food safety officer, sanitary inspector, fire marshal, safety officer, property inspector and insurance adjuster.

Construction rolesSite Inspection Report · Observations · Issues
Health & sanitationHealth & Sanitation Inspection Report · Findings · Violations
Food safetyFood Safety Inspection Report · Findings · Violations
FireFire Safety Inspection Report · Findings · Violations
SafetySafety Inspection Report · Observations · Hazards
PropertyProperty Condition Report · Condition Notes · Defects
InsuranceLoss Assessment Report · Damage Assessment · Damage Items

You can change your profession later from Settings — the wording updates everywhere, including in reports you generate afterwards. Past reports already sent don't change retroactively.

One more thing

What's free, and what Pro adds

Every step above works on the free tier except where marked Pro. Nothing is a subscription — Pro is a one-time purchase, and pricing will be announced when Sayt reaches the App Store.

Free

No account, no trial period

  • 3 projects, 5 visits each
  • Photos, annotations and site plan pins
  • Observations, issues and checklists
  • Camera measuring, including areas
  • Calendar and scheduling
  • PDF reports, standard template
  • Ten weekly and ten custom-range reports

Sayt Pro

One-time purchase — not a subscription

  • Unlimited projects and visits
  • Editable Word (DOCX) reports
  • No report watermark
  • Punchlist OCR import
  • Share and import visit files (handoff)
  • Run a job across a team, and report on all of it
  • Unlimited weekly and custom-range reports
  • Six report templates, unlimited
  • Trash, so deleted visits and projects come back

That's the whole app

Every function, one visit

All thirteen steps above happened on a single visit to Camaya Residence. For the full technical reference — data handling, privacy, exact field behaviour — see the documentation.